Showing posts with label Holidays. Show all posts

14 February 2015

love.

Happy Valentine's Day friends! 
Thought I'd share my favorite love poem in honor of this day :)


Cheers!!
<3 Noonie 

25 December 2014

XMAS 2014

Noonie's Homemade Xmas Card

Merry Merry Christmas friends!! 

Wishing you + yours a very special holiday!!
 Enjoy these times with your family + friends!! These are the moments!! 

Cheers!!
<3 Nelli + Noonie

18 December 2014

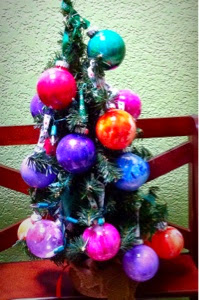
Noonie's | Paint Splattered Ornaments |


I first learned how to make paint splattered ornaments when I was in 6th grade, but hadn't made once since, that is up until last year. I meant to share this DIY tutorial then, but alas I ran out of time + had to make them quickly so I took no pictures! This year I made sure I'd have enough time + I'm so excited to finally share this fun, easy to do project!


27 November 2014

Thanksgiving 2014

Happy Turkey Day Folks!


I give thanks on this day for all of the blessings I have in my life, including these pieces of pies. <3 


Wishing you + yours a special day!

<3 Nelli + Noonie

31 October 2014

BOO!


HAPPY HALLOWEEN!! 

I wish I was sharing pics of my Halloween cookies + cards (like the ones I made last year) but alas this year it just didn't happen. I bought the blank black cards that I intended on using to make my Halloween cards, but when news of my acceptance into my very first art exhibit arrived the cards + cookies got totally pushed to the side as I need to focus all of my time + energy into preparing for the show. So sorry folks! Definitely will be making my Christmas cards though this coming December!  

Since I don't have any crafted Halloween goodies to share with ya I thought it'd be fun to share this pic of my favorite Halloween decoration of all the Halloween ones we have (there are many as my mom is a holiday decorating extremist)! We've had this little house for years now, but it's still the one I look for first when it's time to decorate! :) 

Hope you all have a fun + safe holiday from us here at BSOM!!

Until next time friends....Cheers!!

<3 Noonie 

04 July 2014

|The Epitome of Summer|

Happy 4th of July from us here @ BSOM!! 


Wanted to share this cake I made :) Hope everyone has a fun + safe holiday!! 

Until next time friends!! Cheers!!

<3<3 Nelli + Noonie

20 April 2014

Hippity Hop

Happy Easter all!


Hope you're all enjoying a beautiful Sunday with your family + friends! I wanted to share this classic Easter movie that I've watched every Easter since I was a kid. Enjoy!


The Easter Bunny Is Comin' To Town (1977)


Until next time friends...Cheers!

<3 Noonie


P.S. I want to know...
What are some of your Easter traditions??
Comment below! :)


04 December 2013

Gobble! Gobble!


This photo does NOT do this
dessert justice! :)

Well Thanksgiving has come and gone but I did want to share my little Turkey day creation. It is the season for pumpkin recipes after all. This was my boyfriend and I's 3rd Thanksgiving together, and just like many couples out there we have a split, run around, kind of day as we wanted to spend the day together and with our families. As typical this year we got to lounge around in the morning and spend some time together before we headed off to his uncle and aunt's home in Folsom, dessert in tote. After a delicious meal and dessert we headed to my mom's for "Dessert Round 2", which included pumpkin and cherry pies, as well as this delicious ambrosia salad that my mom makes for every holiday. It's one of those "I don't feel right if I don't eat it on a holiday" type desserts, that I truly look forward to. After all that grubbin', it was of course right to bed when we arrived home later that night. All in all a good turkey day.

So back to that "Turkey day creation" aka "Layered Pumpkin Dessert" that I mentioned earlier. I knew I wanted to make some sort of dessert that incorporated pumpkin. I also knew I wanted to make a dessert that I had never eaten before, or seen at a holiday function, and this is where this awesome recipe comes into play. I initially found this recipe on Pinterest, it immediately caught my eye because not only did it look good, but it sounded out of this world! So without further adieu.....

Layered Pumpkin Dessert

Prep Time: 3-4 Hours
Bake Time: 40 minutes

Ingredients:

25 Ginger Snaps, finely crushed (1 1/3 Cup)
1/4 Cup Butter, melted
2 pkg. 8 oz. Cream Cheese,softened
1/2 Cup Sugar
1 1/2 Cup Canned Pumpkin
1/2 t. Ground Cinnamon
1/4 t. Ground Nutmeg
2 Eggs
2 pkg. Vanilla Instant Pudding
1 Tub Whipped Cream
1/2 Cup Pecans,chopped

Method:

Heat oven to 350
Mix cookie crumbs and butter, press onto bottom of 13x9 pan, bake 10 mins
Beat cream cheese and sugar with mixer until well blended
Add pumpkin and spices mix, then add eggs 1 at a time blend all well, pour onto crust
Bake for 30 mins, then cool for 1 hour
Beat pudding mixes and milk with whisk for 2 mins, stir in 1/2 of your whipped cream, spread over dessert
Spread remaining whipped cream on top and refrigerate 3 hours or until firm
Sprinkle with nuts before serving.


I didn't change the recipe much except when I made it I opted to use Pumpkin Pie Spice instead of the cinnamon and nutmeg as it contained both of these spices. The other thing I did do different was use a muffin tin instead of a 13x9 pan as I wanted to make individual servings, this really pumped up the dessert's appeal! This recipe was pretty straightforward and the dessert turned out delicious! 


Hope everyone had a nice Turkey day! Heerrreee comes Christmas!
Until next time..cheers!!!


29 October 2013

Halloween Treats!


Tasting the spirit of Halloween!
This has been the first Halloween in years that I've really gotten into. That being said I decided I wanted to make some Halloween cookies for the neighbors. What initially gave me the idea to make cookies was the fact that I found a pack of 18 Halloween cookie cut outs for sale at Michael's for $1.99. Not bad. I'm sure they are even cheaper now as Halloween is almost upon us. (On another note not related to cookies, Michael's has a 40% off mobile coupon available on their website, which is always good to know..your welcome ;).) Anyways back to the mission of these Halloween cookies, I wanted to make sugar cookies but didn't have a good recipe that's were good ol' Google came in. Found a simple sugar cookie recipe and away I went, the recipe stated it would yield 24 cookies, but I ended up with 42 which worked for me.

Fresh out of the oven

Simple Sugar Cookies

Ingredients:
1 Cup Butter
1 Cup Sugar
1 Large Egg
1 Teaspoon Vanilla Extract
2 Teaspoon Baking Powder
2 3/4 Cup Flour

Directions:
Cream butter and sugar
Add egg and vanilla
Mix all dry ingredients, slowly add butter mix, stir
Roll out dough on floured board
Cut out and bake at 400 for 7-10 minutes
Cookies will be light in color with light browning along the edges


Cookies galore!

Now before we start talking about frosting let me forewarn you be sure you have plenty of time on your hands before beginning the frosting part of this venture, especially if you're planning on mixing more than just a few colors worth of frosting. It took me about 2 hours from start to finish to make and mix all of the variety of colored frosting and to frost the cookies themselves.

Typically when I make homemade frosting I just mix powdered sugar and water but wanted to see if there was a different variation on this and of course there was. Found a recipe for frosting which was pretty much as the same one I had been making except it calls for milk instead of water. I ended up liking the milk better than the water as it made the frosting thicker. The frosting recipe also called for vanilla extract which gave the frosting a nice taste, but I did not like the off white color the vanilla gave the frosting. I ended up using this off white frosting for my colored frosting, by simply adding food coloring to it. To create a nice bright white I cut out the vanilla extract, and just used powdered sugar and milk, which worked great. I really liked this frosting recipe as the frosting was thick, and it set quickly which made it easier to do my designs. As the frosting does set fairly quickly I would suggest only making a small batch at a time, and to only do one color of frosting at a time if that's the case. I would also suggest to only decorate one cookie at a time as it does set quickly. I tried to frost a few cookies at a time and had to work against time to spread the frosting before it set. Learn from my mistakes :)


Off white frosting due to vanilla extract
Bright white due to no vanilla extract

Simple Cookie Frosting

Ingredients:
1 Cup Powdered Sugar
1 1/2 Tablespoon Milk
1 Teaspoon Vanilla Extract

Directions:
Combine all ingredients until smooth.

As I stated I used food coloring to create different colors for the frosting and learned a few new things about mixing colors with food coloring. Being as I was making Halloween cookies I needed a good black frosting. I hadn't thought about it until after I got home (as they do sell black food coloring at the store) so I decided to try my hand at creating some black frosting, boy was that an experience. I did some searching online to see if anyone else out there had concocted a good recipe for black frosting, and found one recipe to try which entailed of 4 drops of red & blue, and 2 drops of green and yellow. I followed the directions as is but the color initially turned out to be an army green. I found I had to add a bunch more red and blue to finally achieve a dark dark brown, which became blacker as it dried. I was happy with how my black came out but if I require a lot of black frosting in the future I will definitely just buy the black food coloring as it would save me time and irritation lol. I found a good recipe for orange turned out to be 2 parts yellow, 1 part red. The rest of the colors I created were pretty straight forward just using the primary colors of the food coloring with some frosting. 


My black frosting
The perfect Halloween orange :)

 Although it did take some time to make these holiday cookies I am super proud of my first ever Halloween cookies, and I know the neighbors were happy with them too ;)

**Enjoy and Happy Halloween! Cheers!**

21 October 2013

This is Halloween! This is Halloween!

My homemade Halloween cards :)

First things first yes I've been blog slacking. I have no excuse other than feeling a bit off and uninspired, but with Halloween right the corner I decided I better get into gear! I wanted to "get into the spirit" of this upcoming holiday and thought it'd be fun to send out Halloween cards for the first time. They had a ton of cute cards at the store, but I wanted to add my own personal touch so thought I'd make mine own instead!

I wanted to keep it simple but still make a bold statement so I decided to use some good ol' fashion glue and glitter. I wanted the glitter to really "pop" so I picked up some blank black cards and envelopes from Michael's. I had already purchased a 12 pack of assorted color glitter from Walmart prior to going to Michael's which ended up being a mistake as Michael's had cheaper glitter in smaller quantities (which is more ideal for this project). But ya live and ya learn right? 

All stocked up on my supplies I headed home to get to the fun part. As I stated before I wanted to keep the design simple for my cards so decided to do silhouette style design. To start I just sketched out my design on the card, "filled" it in with the glue, sprinkled some glitter on top, then shook off the excess glitter and BAM my first homemade Halloween card was done. The process of making these Halloween cards was simple and only took a little time but I'm very happy with the outcome!

Rough sketch
Adding the glitter
Ta da!
In this day and age home made cards are becoming some what of a "dead tradition" for lack of better words. This is one reason I decided to make my own cards.  I plan on continuing this new "tradition" of mine in an effort to keep homemade cards alive! 

10/21/13 UPDATE: Whoops! I forgot to add a very important final step for the cards! To prevent the glitter from getting everywhere I sprayed fixative on my cards! But I'm sure hairspray would do the trick too! ;)


On another note, while I was at Michael's I noticed a flyer on their window advertising that they are a "drop off" location for something called "Operation Christmas Cards". "Operation Christmas Cards" was set up in order to collect Christmas cards to send out to all active military personnel. A large number of troops aren't able to spend the holidays with their families as they are out protecting our freedom, which is where Operation Christmas Cards comes in! The goal of operation Christmas Cards is to send out quality, preferably home made Christmas cards, to show our appreciation for our military personnels' sacrifices. I think this is a great cause and wanted to get you all involved! 

Check out this LINK for more information about Operation Christmas Cards!!! 

Until next time friends...Cheers!!!

<3 Noonie